Armed with the actual angle in the corner of your room, you’re ready to cut your crown molding. You may think the best way is to split the angle, then place the crown molding in your miter saw on an angle, as if it’s up against the wall and the ceiling. But it’s easier to cut on the flat using a compound miter saw. The only problem is figuring out the angle. If you’re a math whiz, you can figure it out with a scientific calculator, using tan and cos and various calculations. But if you have a computer handy, just go on the Internet and search using “crown molding” and “calculator”. A lot of helpful souls have set up calculators to do the math for you. Plug in the wall angle, and you discover exactly how to place your stock and the saw and what to set your angle and bevel to.
Make sure you know the angle of the molding you’re using, though. While a lot of trim is based on a 45 degree angle between the wall and the backside of the molding and the ceiling and the back side of the molding, you’ll also find some has a different angle: a 52-38 degree combo.
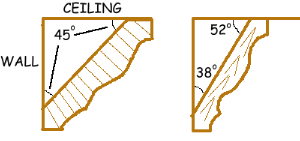
Make sure the calculator you’re using allows you to take this into account or specifies the type of molding it’s based on.
Tip: If you’ve made the perfect cut and your joint is not yet perfect, you can still adjust the fit by shimming away from the ceiling or the wall using thin shims or matchsticks.
More tips next time.